Next, we add the fields to selected page layouts; you will have to choose those on which the master and detail fields are to appear.
And almost finished, because we need to save this configuration with the Save button.
Congratulations – you have just created your own master-detail relationship! Unless you just received a Cannot Create Master-Detail Relationship error. The reason for this is existing records. Remember when I mentioned that the master-detail relationship is mandatory? That’s exactly why we cannot save this field. But fortunately, there is a solution: just create a new lookup field, then add a relationship with the selected object (future master object), and populate the master record in the lookup field. After entering this data into each record, we change the type of field from lookup to master-detail. Voilà – it’s ready!
And speaking of the lookup field, it’s the more relaxed brother of master-detail. In this relationship, we can connect two records. Thanks to this, users can choose a record from another or even the same object, thus creating a relationship between the two. The records are somewhat dependent on each other, but most importantly, they are not dependent on each other in terms of existence or access. To illustrate this better, look at the next screenshot. If we compare this with the master-detail relationship, in this case, if the Comicon event is canceled, but there are plenty of other cool events nearby, the attendees won’t go home but will choose another one:

Figure 5.4 – Lookup with record; lookup without or with another record
As you can see, the lookup relationship can manage without the chosen record (unless you set it as mandatory). If the record from the lookup is deleted, nothing happens because the main record can still exist normally in the system.
How to create a lookup? It’s quite simple:
- The principle is quite similar in both relationships (lookup/master-detail). We go to Setup | Object Manager and select the object where we want to create a new lookup relationship.
- We enter the Fields & Relationships section, click on the New button, and select Lookup Relationship.
- Now, we need to select an object. We choose it from the available Related To list. After choosing, we click on it and confirm with the Next button.
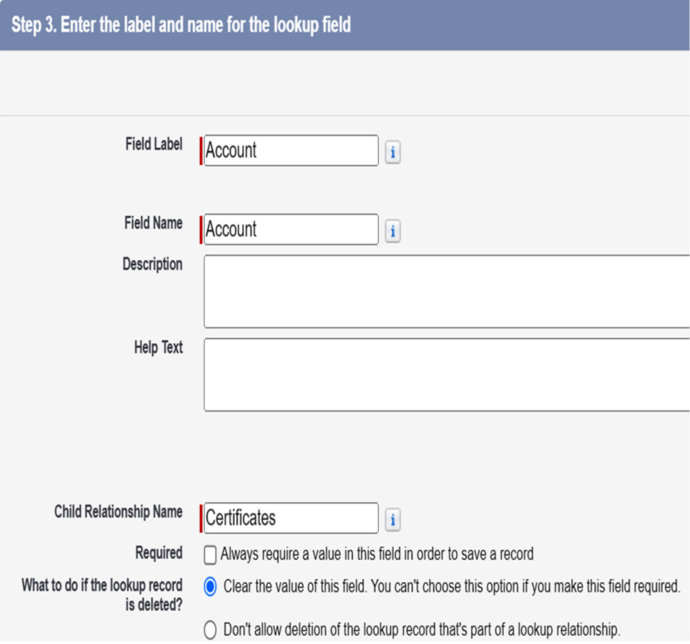
- We assign a field label, field name, description, and help text if needed. We enter a child relationship name (internal name). We set whether the field is to be mandatory or not, the behavior if the lookup record is deleted, and add the field to Reports.
- At the very bottom, we have the choice of lookup filter, which is setting the appropriate conditions that will decide which record we can select and which we cannot. It looks like this:

Figure 5.5 – Lookup configuration settings
- The fourth step is fairly standard when adding fields – setting visibility and profiles.
- Next, we add the fields to selected page layouts and save the configuration with the Save button.
